Example - Fitbit integration
Fitbit represents an example of a wearable physical activity tracker which synchronizes collected data to the cloud. Additionally, Fitbit offers a REST API, enabling remote access to the collected data.
In this example, we will walk you through the process of integrating Fitbit to Hubro. You can use this guide as a recipe for integrating other similar services that your research may have use for. In this sense, Fitbit presents a perfect example, also due to the fact that it utilizes an OAuth2 authentication scheme that is commonly used also in other APIs.
Registering a new application at Fitbit
In case you haven't worked with Fitbit API before (or you currently don't have any application registered) please visit Getting Started with the Fitbit APIs guide that you can follow to register a new application at Fitbit.
Once you are finished with the registration process, you should possess two variables: Client ID and Secret.
Generating a new Hubro plugin
Follow instructions in the Preparations sections of Extending Hubro chapter (if you haven't done that already) and generate a new plugin by running
Implementing the plugin
Setting up plugin info
Each plugin needs to provide appropriate information to Hubro. This information is then interpreted in various stages when a participant or study administrator is interacting with the system. For the Fitbit plugin the provided information may look like this
User's authorization
Additionally, we will focus on the authorize() function that you need to implement in order to allow the user to log in to their account. The control is handed over to the authorize() function in two scenarios:
User has received an invitation to enable the plugin via email and started the authorization process by clicking on the link
User has started the authorization process from the user's area
In the authorize() function body you need to handle everything that needs to be done as a part of initial setup. As we mentioned before, the Fitbit service uses OAuth2 scheme that we need to initiate here.
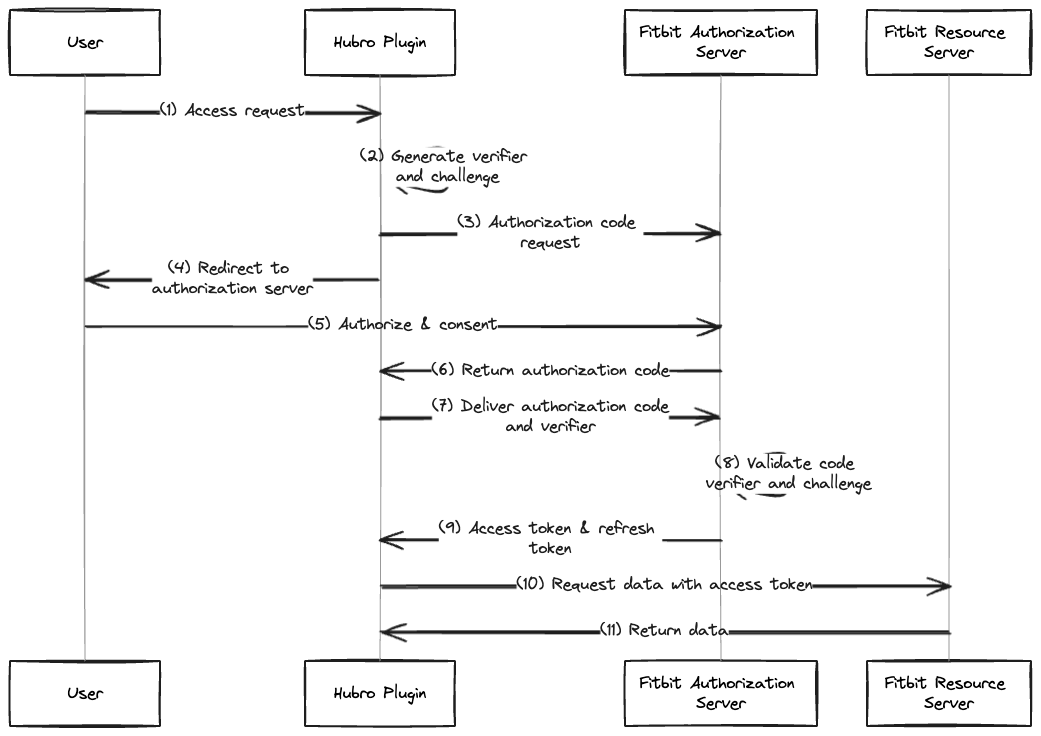
The authorization process is described at the detail here. For a general overview, refer to the sequence diagram below.

The authorization sequence begins at (1) (that is where we take over the control in the plugin's code), and follows with multiple HTTP requests resulting in acquiring access and refresh tokens (11). Also, at (4) the control is temporarily transferred to a user, that needs to log in to the Fitbit service and acknowledge types of data to which the plugin has access.
The instrument that we can use to trigger HTTP requests is included at the Spin SDK package. For example - the code covering the Code Verifier and Code Challenge generation (2) and sending the Authorization Code request to Fitbit (3) may look like this
As you may observe, in the code snippet above we are using an additional element from the Spin SDK - the Key-Value Store. Using the Store we can temporarily persist data after the control is released and before is returned again (e.g. when the user is redirected to the Fitbit authorization page).
Follow this link, to take a look at how the full authorization sequence from (1) to (11) looks like.
Obtaining and storing the data
Hubro Scheduler can transfer the control to your plugin in various intervals. In order to react on these requests from Scheduler, the plugin needs to implement the process() function.
In the process function you should integrate everything that is supposed to happen once the control is transferred to your plugin. In our use case we need to:
Fetch data from the Fitbit service
By visiting the documentation of Fitbit service, we can see that fetching of collected data is a matter of triggering another HTTP request that is accompanied by the access token that we obtained earlier.
Which can be transcribed into a Spin HTTP request such as
Resulting JSON containing activity series data needs to be converted into FHIR records before we are able to store it, which is described in the next section.
Convert the data to HL7 FHIR records
Hubro is built around HL7 FHIR. When new data is about to, the preferred way how to do this is using BundleEntries containing individual Observations, all packed within a Bundle.
To generate an empty Bundle, where you can include individual BundleEntries use
Afterwards you can generate and push individual BundleEntries using
Push converted data into the FHIR server
Finally, once the data is converted into FHIR records, it needs to be pushed to the FHIR server through Hubro. That can be again facilitated using the hubro-sdk library.